In this Web scraping Java tutorial we will enter deep crawling: an advanced form of web scraping. This comprehensive guide on web scraping in Java will use deep crawling with the Java Spring Boot to scrape the web.
Through deep crawling, even the most secluded sections of a website become accessible, revealing data that might otherwise go unnoticed.
更值得注意的是,我们不仅仅谈论理论——我们将向您展示如何做到这一点。 使用 Java Spring 启动 和 Crawlbase Java 库,我们将教您如何使深度爬行成为现实。 我们将帮助您设置工具,解释浅层爬行和深度爬行之间的区别(它并不像听起来那么复杂!),并向您展示如何从不同的网站页面提取信息并将其存储在您身边。
To understand the coding part of web scraping Java, you must have a basic understanding of Java Spring Boot and MySQL database. Let’s get started on how to build a web scraper in Java.
目录:
- 了解深度爬行:Web 数据的门户
- Why do you need to build a Java Web Scraper
- How to do Web Scraping in Java
- 做好准备:准备环境
- Simplify Spring Boot Project Setup with Spring Initializr
- 将 Starter 项目导入 Spring Tool Suite
- 了解项目的蓝图:项目结构一瞥
- 开始编码之旅
- 运行项目并启动深度爬取
- Analyzing Output in the Database
- 结论
- 常见问题解答
Deep Crawling in Java.
Deep crawling, also known as web scraping, is like digging deep into the internet to find lots of valuable information. In this part, we’ll talk about what deep crawling is, how it’s different from just skimming the surface of websites, and why it’s important for getting data.
Basically, deep crawling is a smart way of looking through websites and grabbing specific information from different parts of those sites. Unlike shallow crawling, which only looks at the surface stuff, deep crawling digs into the layers of websites to find hidden gems of data. This lets us gather all sorts of info, like prices of products, reviews from users, financial stats, and news articles with web scraping using Java.
Deep crawling helps us get hold of a bunch of structured and unstructured data that we wouldn’t see otherwise. By carefully exploring the internet, we can gather data that can help with business decisions, support research, and spark new ideas with Java web scraping.
浅爬行和深爬行的区别
Shallow crawling is like quickly glancing at the surface of a pond, just seeing what’s visible. It usually only looks at a small part of a website, like the main page or a few important ones. But it misses out on lots of hidden stuff.
On the other hand, deep crawling is like diving deep into the ocean, exploring every nook and cranny. It checks out the whole website, clicking through links and finding hidden gems tucked away in different sections. Deep crawling is super useful for businesses, researchers, and developers because it digs up a ton of valuable data that’s otherwise hard to find.
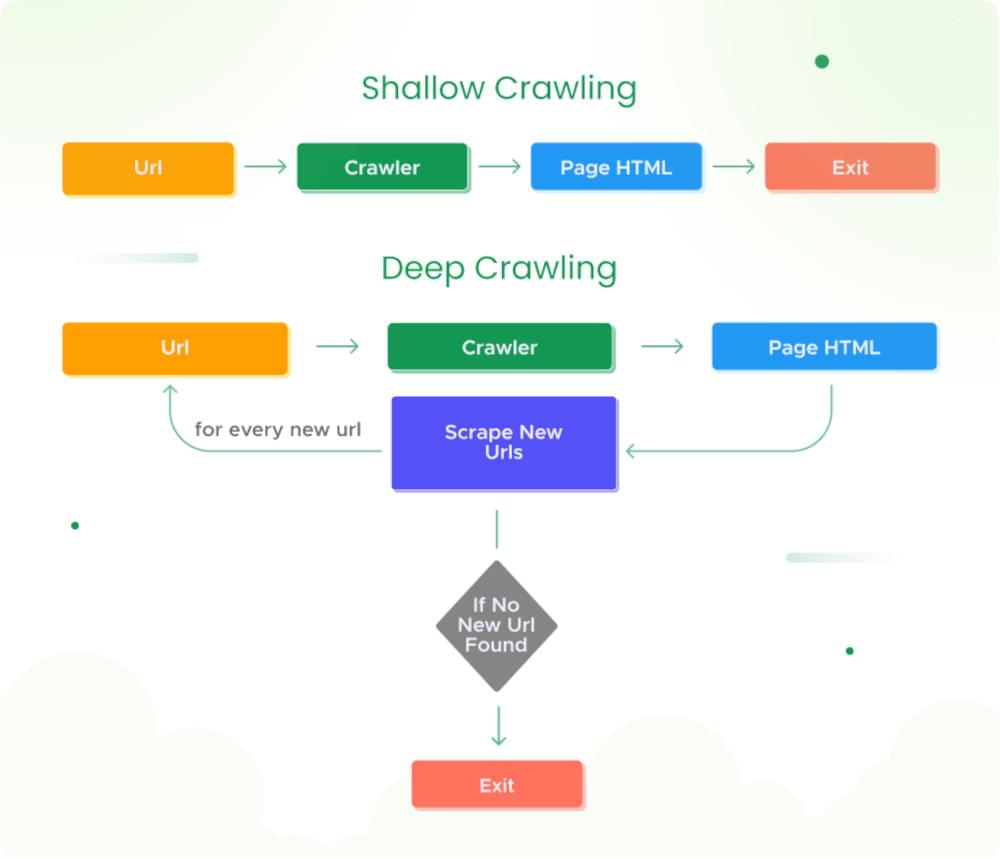
探索深度爬行的范围和意义
深度爬取的范围远远超出了数据提取; 它是了解网络动态和发现推动决策的见解的门户。 从想要监控竞争对手网站上的产品价格的电子商务平台到旨在分析文章情绪的新闻机构,深度爬行的应用与其所揭示的数据一样多种多样。
In research, deep crawling is like the base for analyzing data to understand new trends, how people use the internet, and what content they like. It’s also important for following laws and rules, because companies need to think about the right way to gather data and follow the rules of the websites they’re getting it from.
In this tutorial, we will dig deep into web scraping Java.
Why do you need to build a Java Web Scraper
You need a Java web scraper to gather and utilize website information. One such web scraper is Crawlbase Crawler, but what exactly is Crawlbase Crawler, and how does it work its magic?
什么是 Crawlbase 爬虫?
Crawlbase Crawler 是一种动态 Web 数据提取工具,它提供了一种现代且智能的方法来从网站收集有价值的信息。 与涉及持续轮询的传统抓取方法不同,Crawlbase Crawler 异步运行。 这意味着它可以独立处理提取数据的请求,实时交付数据,无需手动监控。
工作流程:Crawlbase 爬虫如何运行
Crawlbase Crawler 在无缝且高效的工作流程上运行,可以概括为几个关键步骤:
- 网址提交: 作为用户,您可以通过使用 Crawling API 向 Crawlbase Crawler 提交 URL 来启动该过程。
- 请求处理: 爬虫接收这些请求并异步处理它们。 这意味着它可以同时处理多个请求,而无需任何手动干预。
- 数据提取: 爬虫访问指定的URL,提取请求的数据,并将其打包交付。
- 网络钩子集成: Crawlbase Crawler 与 webhook 集成,而不需要手动轮询。 此 Webhook 充当信使,将提取的数据直接实时传送到服务器的端点。
- 实时交付: 提取的数据一旦可用就会立即传送到服务器的 Webhook 端点,从而实现立即访问而不会出现延迟。
- 新鲜见解: 通过实时接收数据,您可以根据最新的网络内容做出明智的决策,从而获得竞争优势。
好处:为什么选择 Crawlbase 爬虫
While a crawler allows instant web scraping with Java , it also has some other benefits:
- 效率: 异步处理消除了持续监控的需要,从而释放资源用于其他任务。
- 实时洞察: 立即接收可用数据,让您能够领先于趋势和变化。
- 简化的工作流程: Webhook 集成取代了手动轮询,简化了数据交付过程。
- 及时决策: 即时访问新提取的数据有助于及时做出数据驱动的决策。
进入 Java web crawler, you must create it within your Crawlbase 帐户仪表板。 您可以根据您的具体需求选择 TCP 或 JavaScript 爬虫。 TCP Crawler 非常适合静态页面,而 JavaScript Crawler 适合通过 JavaScript 生成的内容,如 JavaScript 构建的页面或动态呈现的浏览器内容。 阅读此处了解更多信息 Crawlbase 爬虫.
在创建过程中,它会要求您提供您的 webhook 地址。 因此,我们将在 Spring Boot 项目中成功创建 webhook 后创建它。 在接下来的部分中,我们将更深入地研究编码内容并开发完成我们的项目所需的组件。
How to do Web Scraping in Java
Follow the steps below to learn web scraping in Java.
做好准备:准备环境
在我们开始深度爬行之前,为成功奠定基础非常重要。 本部分将指导您完成基本步骤,以确保您的开发环境已准备好应对未来令人兴奋的挑战。
在 Ubuntu 和 Windows 上安装 Java
Java 是我们开发过程的支柱,我们必须确保它在我们的系统上可用。 如果您的系统上没有安装 Java,您可以根据您的操作系统执行以下步骤。
在 Ubuntu 上安装 Java:
- 按 Ctrl + Alt + T 打开终端。
- 运行以下命令来更新软件包列表:
1 | sudo apt update |
- 通过运行以下命令安装 Java 开发工具包 (JDK):
1 | 须藤apt install default-jdk |
- 通过键入以下内容验证 JDK 安装:
1 | java -version |
在 Windows 上安装 Java:
- 访问官方 神谕 网站并下载最新的 Java 开发工具包 (JDK)。
- 按照安装向导的提示完成安装。 安装后,您可以通过打开命令提示符并键入以下内容来验证它:
1 | java -version |
在 Ubuntu 和 Windows 上安装 Spring Tool Suite (STS):
Spring Tool Suite (STS) 是一个集成开发环境 (IDE),专门为使用 Spring Framework 开发应用程序而设计,Spring Framework 是一种用于构建企业级应用程序的流行 Java 框架。 STS 提供了工具、功能和插件,可增强使用基于 Spring 的项目时的开发体验; 请按照以下步骤安装它们。
- 访问 Spring Tool Suite 官方网站: spring.io/工具.
- 下载适合您的操作系统(Ubuntu 或 Windows)的 Spring Tool Suite 版本。
在 Ubuntu 上:
- 下载后,导航到终端中下载文件所在的目录。
- 提取下载的存档:
1 | # 代替和根据存档名称 |
- 将解压的目录移动到您选择的位置:
1 | # 代替根据提取的文件夹名称 |
在Windows上:
- 运行下载的安装程序并按照屏幕上的说明完成安装。
在 Ubuntu 和 Windows 上安装 MySQL
设置可靠的数据库管理系统对于开启深度爬行和网络数据提取之旅至关重要。 MySQL 是一种流行的开源关系数据库,它为安全地存储和管理通过爬行工作收集的数据提供了基础。 以下是有关如何在 Ubuntu 和 Windows 平台上安装 MySQL 的分步指南:
在 Ubuntu 上安装 MySQL:
- 打开终端并运行以下命令以确保您的系统是最新的:
1 | sudo apt update |
- 运行以下命令安装MySQL服务器包:
1 | sudo apt安装mysql-server |
- 安装完成后,启动MySQL服务:
1 | sudo systemctl 启动 mysql.service |
- 使用以下命令检查 MySQL 是否正在运行:
1 | sudo systemctl status mysql |
在 Windows 上安装 MySQL:
- 访问官方 MySQL网站 并下载适用于 Windows 的 MySQL 安装程序。
- 运行下载的安装程序并选择“开发人员默认”安装类型。 这将安装 MySQL Server 和其他相关工具。
- 在安装过程中,系统会要求您配置 MySQL 服务器。 设置一个强 root 密码并记住它。
- 按照安装程序的提示完成安装。
- 安装后,MySQL 应该会自动启动。 您也可以从 Windows 的“服务”应用程序手动启动它。
验证 MySQL 安装:
无论您使用哪种平台,您都可以通过打开终端或命令提示符并输入以下命令来验证 MySQL 安装:
1 | mysql -u root -p |
系统将提示您输入在安装过程中设置的 MySQL root 密码。 如果连接成功,您将看到 MySQL 命令行界面。
现在您已经准备好 Java 和 STS,您已经为深度爬行冒险的下一阶段做好了准备。 在接下来的步骤中,我们将指导您创建一个 Spring Boot 入门项目,为您的深度爬行工作奠定基础。 让我们深入了解旅程中这个激动人心的阶段!
Simplify Spring Boot Project Setup with Spring Initializr
想象一下,设置一个 Spring Boot 项目就像在一个棘手的设置迷宫中导航。 但不用担心, 春季初始化 是来帮忙的! 这就像在线上有一个智能帮手一样,使整个过程变得更加容易。 您可以手动完成,但这就像拼图一样需要花费大量时间。 Spring Initializr 可以让事情从一开始就变得更加顺利。 按照以下步骤使用 Spring Initializr 创建 Spring Boot 项目。
- 转到 Spring Initializr 网站
打开 Web 浏览器并访问 Spring Initializr 网站。 您可以在以下位置找到它: 启动.spring.io.
- 选择您的项目详细信息
您可以在这里为您的项目做出重要选择。 您必须选择要使用的项目类型和语言。 我们必须选择 Maven的 作为项目类型和 JAVA 作为它的语言。 对于 Spring Boot 版本,请选择稳定的版本(例如 3.1.2)。 然后,添加有关您的项目的详细信息,例如项目名称和内容。 这很简单 - 只需按照图片中的示例操作即可。
- 添加很酷的东西
是时候为您的项目添加特殊功能了! 这就像赋予它超能力一样。 如果您要使用数据库,请包括 Spring Web(这对于 Spring Boot 项目很重要)、Spring Data JPA 和 MySQL 驱动程序。 不要忘记 Lombok – 它就像一个节省时间的神奇工具。 我们将在博客的下一部分中详细讨论这些内容。
- 获取您的项目
选择完所有好东西后,单击“生成”。 您的入门项目将以 zip 文件的形式下载。 完成后,打开 zip 文件以查看项目的开头。
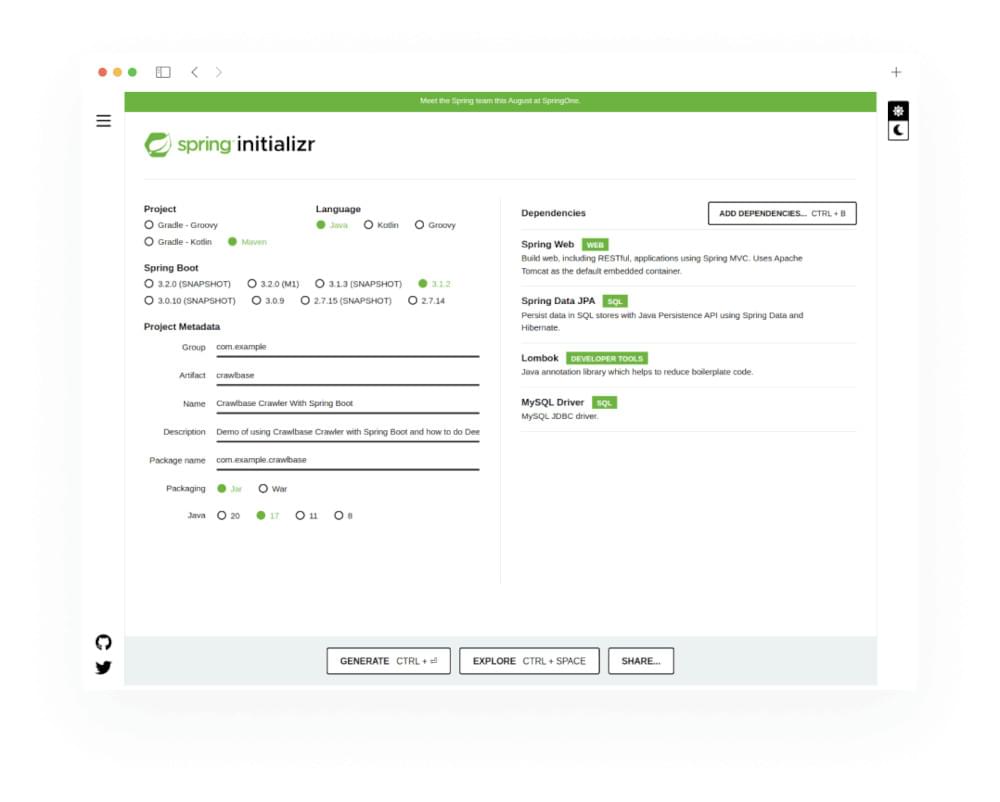
通过遵循这些步骤,您可以确保您的深度爬行冒险顺利开始。 Spring Initializr 就像一个值得信赖的指南,可以帮助您进行设置。 在接下来的部分中,我们将指导您将项目导入到您已安装的 Spring Tool Suite 中。 准备好开始你的深度爬行之旅的这个激动人心的阶段!
将 Starter 项目导入 Spring Tool Suite
好吧,现在您已经完成了 Spring Boot 入门项目的所有设置并准备好运行,下一步是将其导入到 Spring Tool Suite (STS) 中。 这就像邀请您的项目进入一个舒适的工作空间,您可以在其中发挥您的魔力。 操作方法如下:
- 开放式弹簧工具套件 (STS)
首先,启动您的 Spring Tool Suite。 这是您的创意中心,所有编码和制作都将在这里进行。
- 导入项目
导航到“文件”菜单并选择“导入”。 将弹出一个包含各种选项的窗口 - 选择“Existing Maven Projects”并单击“Next”。
- 选择项目目录
单击“浏览”按钮并找到您解压 Starter 项目的目录。 选择项目的根目录并点击“完成”。
- 观看魔术
Spring Tool Suite 将发挥其魔力并导入您的项目。 它出现在工作区左侧的“项目资源管理器”中。
- 准备推出
就是这样! 您的 Starter 项目现已轻松地安装在 Spring Tool Suite 中。 您已准备好开始构建、编码和探索。
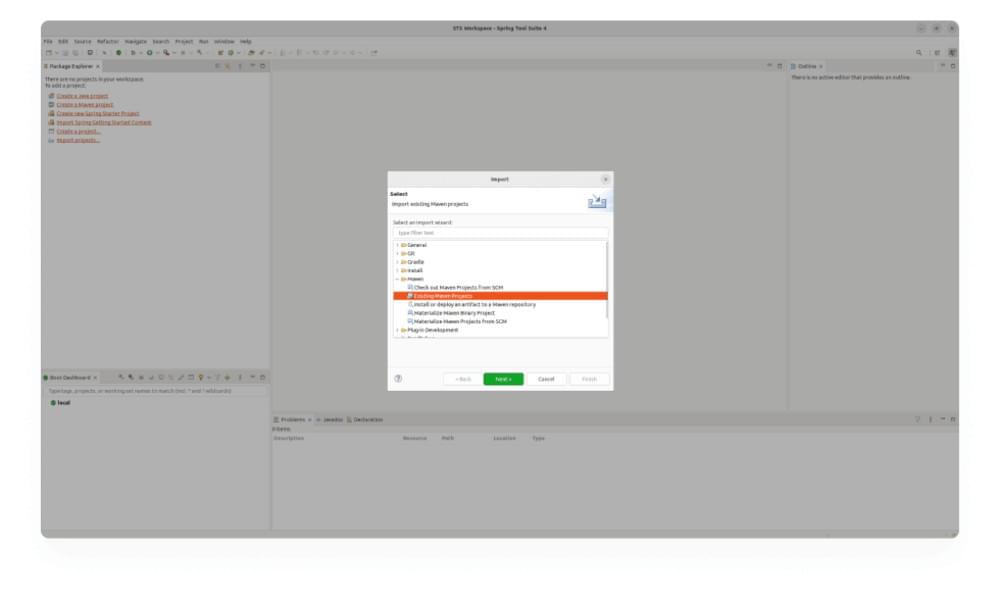
将您的项目引入 Spring Tool Suite 就像打开了无限可能性的大门。 现在您拥有了使您的项目变得令人惊叹的工具和空间。 以下部分将深入研究该项目的结构,剥开各层以揭示其组件和内部工作原理。 准备好踏上探索之旅,揭开其中的奥秘!
了解项目的蓝图:项目结构一瞥
现在您的 Spring Boot 入门项目已经舒适地位于 Spring Tool Suite (STS) 中,让我们来看看它的内部工作原理。 这就像在开始装修新家之前先了解它的布局一样。
Maven and pom.xml
项目的核心是一个名为 Maven 的强大工具。 将 Maven 视为项目的组织者 - 它管理库、依赖项和构建。 名为 pom.xml 的文件是所有与项目相关的魔法发生的地方。 它就像告诉 Maven 做什么以及你的项目需要什么的蓝图。 就我们的例子而言,目前我们将在 pom.xml 项目中使用它。
1 |
|
Java 库
还记得您在创建项目时添加的那些特殊功能吗? 它们被称为依赖项,就像神奇的工具一样,可以让您的项目变得更加强大。 当您从 Spring Initializr 中包含 Spring Web、Spring Data JPA、MySQL 驱动程序和 Lombok 时,您实际上是在添加这些库。 您可以在上面的 pom.xml 中看到这些内容。 它们为您的项目带来预构建的功能,从而节省您的时间和精力。
- 春季网: 该库是您构建 Spring Boot Web 应用程序的门票。 它有助于处理请求和创建 Web 控制器等事情。
- 春季数据 JPA: 如果您正在处理数据库,这个库就是您的盟友。 它简化了数据库交互和管理,让您专注于项目的逻辑。
- MySQL 驱动程序: 当您使用 MySQL 作为数据库时,此驱动程序可帮助您的项目与数据库有效通信。
- 龙目岛: 告别重复代码! Lombok 减少了您通常需要编写的样板代码,使您的项目更干净、更简洁。
了解项目结构
当您浏览项目的文件夹时,您会注意到所有内容都组织得井井有条。 您的 Java 代码进入 src/main/java 目录,而配置文件和静态资产等资源则驻留在 src/main/resources 目录中。 您还可以在这里找到 application.properties 文件 - 它就像项目的控制中心,您可以在其中配置设置。
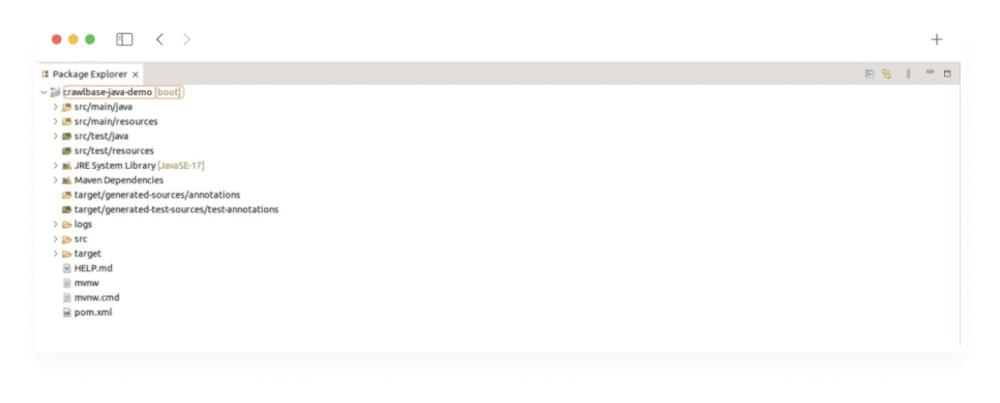
在 src/main/java 目录中我们会发现一个包含具有 main 功能的 Java 类的包。 该文件充当 Spring Boot 项目执行时的起点。 在我们的例子中,我们将有 CrawlbaseApplication.java 文件包含以下代码。
1 | 包 com.example.crawlbase; |
现在您已经熟悉了要点,您可以自信地驾驭您的项目环境。 在开始编码之前,我们将深入研究 Crawlbase 并尝试了解它的工作原理以及如何在我们的项目中使用它。 因此,准备好揭开爬虫的真正威力吧。
Starting the Coding Journey to Java Scraping
Now that you have Java web scraping framework, Java web scraping library and Java web scraper set up, it’s time to dive into coding of Java web scraping tutorial. This section outlines the essential steps to create controllers, services, repositories, and update properties files. Before getting into the nitty-gritty of coding, we need to lay the groundwork and introduce key dependencies that will empower our project.
Since we’re using the Crawlbase Crawler, it’s important to ensure that we can easily use it in our Java project. Luckily, Crawlbase provides a Java library that makes this integration process simpler. To add it to our project, we just need to include the appropriate Maven dependency in the project’s pom.xml file.
1 | <依赖> |
添加此依赖项后,快速 Maven 安装将确保从 Maven 存储库下载 Crawlbase Java 库并准备好执行操作。
集成 JSoup 依赖项
鉴于我们将深入研究 HTML 内容,因此拥有一个强大的 HTML 解析器至关重要。 JSoup 是一个强大且多功能的 Java HTML 解析器。 它提供了导航和操作 HTML 结构的便捷方法。 为了利用它的功能,我们需要通过另一个 Maven 依赖项将 JSoup 库包含在我们的项目中:
1 | <依赖> |
设置数据库
在继续之前,让我们通过创建数据库为我们的项目奠定基础。 按照以下步骤创建 MySQL 数据库:
- 打开 MySQL 控制台: 如果您使用的是 Ubuntu,请启动终端窗口。 在 Windows 上,打开 MySQL 命令行客户端或 MySQL Shell。
- 登录MySQL: 输入以下命令并在出现提示时输入您的 MySQL root 密码:
1 | mysql -u root -p |
- 创建一个新数据库: 登录后,使用所需名称创建一个新数据库:
1 | # 将database_name替换为您选择的名称 |
规划模型
在深入研究模型规划之前,我们先了解一下当 URL 被推送到爬虫程序时会返回什么,以及我们在 Webhook 中收到什么响应。 当我们向爬虫发送 URL 时,它会返回一个请求 ID,如下所示:
1 | { “摆脱”: "1e92e8bff32c31c2728714d4" } |
一旦爬虫有效地爬取了 HTML 内容,它就会将输出转发到我们的 webhook。 响应将如下所示:
1 | 头: |
因此,考虑到这一点,我们可以考虑以下数据库结构。
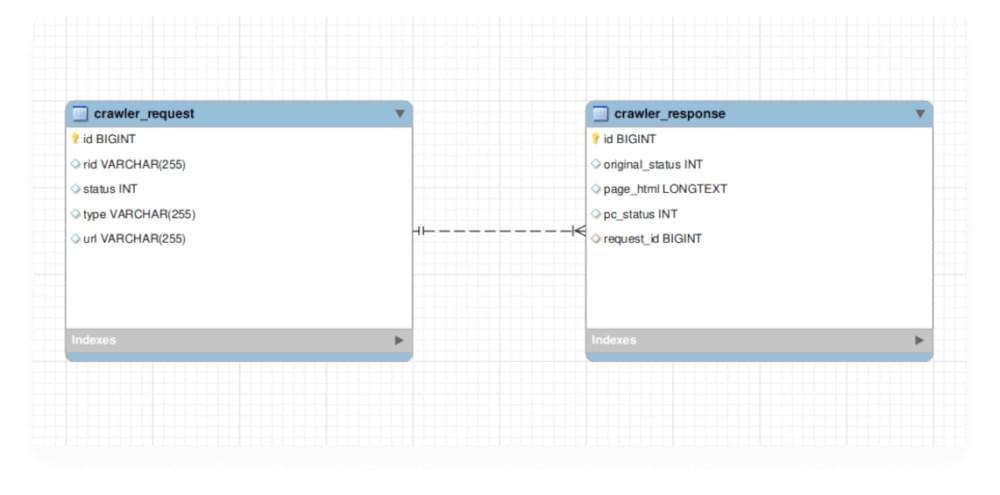
我们不需要直接创建数据库表,因为我们将使 Spring Boot 项目在运行时自动初始化表。 我们即将会做到 过冬 为我们做这件事。
设计模型文件
有了上一节奠定的基础,让我们深入研究模型文件的创建。 在里面 com.example.crawlbase.models 包中,我们将制作两个基本模型: CrawlerRequest.java 和 CrawlerResponse.java。 这些模型封装了我们数据库表的结构,为了确保效率,我们将使用 Lombok 来减少样板代码。
爬虫请求模型:
1 | 包 com.example.crawlbase.models; |
爬虫响应模型:
1 | 包 com.example.crawlbase.models; |
为两种模型建立存储库
创建模型后,下一步是建立存储库以实现项目和数据库之间的无缝交互。 这些存储库接口充当重要的连接器,利用 JpaRepository 接口提供数据访问的基本功能。 Hibernate 是一个强大的 ORM 工具,它处理 Java 对象和数据库表之间的底层映射。
创建一个包 com.example.crawlbase.repositories 并在其中创建两个存储库接口, CrawlerRequestRepository.java 和 CrawlerResponseRepository.java.
CrawlerRequestRepository接口:
1 | 包 com.example.crawlbase.repositories; |
CrawlerResponseRepository接口:
1 | 包 com.example.crawlbase.repositories; |
规划 API 和请求正文映射器类
利用 Crawlbase 爬虫需要设计两个关键的 API:一个用于将 URL 推送到爬虫,另一个用作 Webhook。 首先,让我们规划这些 API 的请求正文结构。
推送 URL 请求正文:
1 | { |
至于 webhook API 的请求正文,它必须与爬虫的响应结构保持一致,如前所述。 您可以阅读更多相关内容 点击此处.
根据此规划,我们将在 com.example.crawlbase.requests 包装:
CrawlerWebhookRequest 类:
1 | 包 com.example.crawlbase.requests; |
ScrapeUrlRequest 类:
1 | 包 com.example.crawlbase.requests; |
创建ThreadPool来优化webhook
如果我们不优化我们的 webhook 来处理大量请求,就会导致隐藏的问题。 这就是我们可以使用多线程的地方。 在JAVA中,ThreadPoolTaskExecutor用于管理并发执行异步任务的工作线程池。 当您有可以独立且并行执行的任务时,这特别有用。
创建一个新包 com.example.crawlbase.config 并建立 ThreadPoolTaskExecutorConfig.java 文件中。
ThreadPoolTaskExecutorConfig 类:
1 | 包 com.example.crawlbase.config; |
创建控制器及其服务
由于我们需要两个 API 并且业务逻辑有很大不同,因此我们将在单独的控制器中实现它们。 独立的控制器意味着我们将拥有独立的服务。 我们首先创建一个 MainController.java 及其服务 MainService.java。 我们将在此控制器中实现您在爬虫上推送 URL 的 API。
创建一个新包 com.example.crawlbase.controllers 对于控制器和 com.example.crawlbase.services 用于项目中的服务。
主控制器类:
1 | 包 com.example.crawlbase.controllers; |
正如你在上面看到的,我们创建了一个restful API“@POST /scrape/push-urls”,它将负责处理将URL推送到爬虫的请求。
主要服务类别:
1 | 包 com.example.crawlbase.services; |
在上面的服务中,我们创建了一个 Async 方法来异步处理请求。 pushUrlsToCrawler函数使用Crawlbase库将URL推送到Crawler,然后将接收到的RID和其他属性保存到crawler_request表中。 要将 URL 推送到爬虫,我们必须使用“爬虫”和“回调”参数。 我们还使用“callback_headers”发送自定义标头“类型”,我们将使用它来了解该 URL 是否是我们提供的 URL,或者是在深度爬行时被抓取的 URL。 您可以在此处阅读有关这些参数和许多其他参数的更多信息。
现在我们必须实现我们将使用 Webhook 的 API。 为此创建 WebhookController.java ,在 com.example.crawlbase.controllers 包装和 WebhookService.java ,在 com.example.crawlbase.services 包。
WebhookController 类:
1 | 包 com.example.crawlbase.controllers; |
在上面的代码中,您可以看到我们创建了一个restful API,“@POST /webhook/crawlbase”,它将负责接收来自Crawler的输出请求的响应。 您可以在代码中注意到,我们忽略 USER_AGENT 作为“Crawlbase Monitoring Bot 1.0”的调用,因为 Crawler Monitoring Bot 请求此用户代理检查回调是否有效且可访问。 因此,无需处理此请求。 只需向爬虫返回成功的响应即可。
在使用 Crawlbase Crawler 时,您的服务器 Webhook 应该...
- 可从 Crawlbase 服务器公开访问
- 准备好接收 POST 调用并在 200 毫秒内响应
- 在 200ms 内响应,状态码 200、201 或 204,无内容
Webhook服务类:
1 | 包 com.example.crawlbase.services; |
WebhookService 类在有效处理 Webhook 响应和编排深度爬行过程中发挥着至关重要的作用。 收到 Webhook 响应时,将从 WebhookController 的crawlbaseCrawlerResponse 函数异步调用handleWebhookResponse 方法。 此方法首先解压缩压缩的 HTML 内容并提取必要的元数据和 HTML 数据。 然后,提取的数据用于构造 CrawlerWebhookRequest 对象,其中包含状态、请求 ID (rid)、URL 和 HTML 内容等详细信息。
接下来,服务检查是否存在与请求 ID 关联的现有 CrawlerRequest。 如果找到,它会构造一个 CrawlerResponse 对象来封装相关的响应详细信息。 然后,该 CrawlerResponse 实例通过 CrawlerResponseRepository 保存在数据库中。
然而,该服务的与众不同之处在于它能够促进深度爬行。 如果 Webhook 响应类型指示“父”URL,则服务将调用 deepCrawlParentResponse 方法。 在此方法中,使用 Jsoup 库解析 HTML 内容以识别页面内的超链接。 这些代表子 URL 的超链接经过处理和验证。 仅保留属于相同主机名并遵循特定格式的 URL。
然后,使用“子”类型作为标志,使用 MainService 将这些有效的子 URL 推送到爬行管道中。 这会启动深度爬行的递归过程,进一步爬行子 URL,将探索扩展到互连页面的多个级别。 本质上,WebhookService 协调处理 Webhook 响应、捕获和保存相关数据以及通过智能识别和导航父 URL 和子 URL 来协调复杂的深度爬行过程。
更新 application.properties 文件
在最后一步中,我们将配置 application.properties 文件来定义项目的基本属性和设置。 该文件充当配置应用程序各个方面的中心枢纽。 在这里,我们需要指定与数据库相关的属性、Hibernate 设置、Crawlbase 集成详细信息和日志记录首选项。
确保您的 application.properties 文件包含以下属性:
1 | # 数据库配置 |
您可以找到您的 Crawlbase TCP(普通)令牌 点击此处。 请记住将上述代码中的占位符替换为您的实际值(如前面部分中确定的)。 此配置对于建立数据库连接、同步 Hibernate 操作、与 Crawlbase API 集成以及管理应用程序的日志记录至关重要。 通过仔细调整这些属性,您将确保项目中不同组件和服务之间的无缝通信。
运行项目并启动深度爬取
编码阶段完成后,下一步就是启动项目。 Spring Boot 的核心采用嵌入式 Apache Tomcat 构建,可实现从开发到生产的平稳过渡,并与著名的平台即服务无缝集成。 在 Spring Tool Suite (STS) 中执行项目涉及一个简单的过程:
- 右键单击 STS 项目结构树中的项目。
- 导航到“运行方式”菜单。 和
- 选择“Spring Boot应用程序”。
此操作会触发项目在本地主机的端口 8080 上启动。
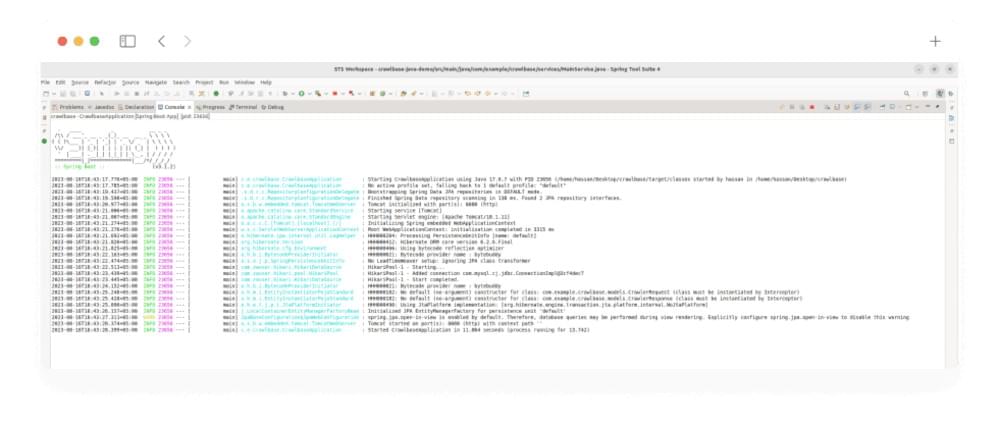
使 Webhook 可供公开访问
由于我们建立的 Webhook 驻留在我们系统的本地主机上,端口 8080,因此我们需要授予它公共访问权限。 进入 恩格罗克,一种创建安全隧道的工具,无需操作网络设置或路由器端口即可授予远程访问权限。 Ngrok 在端口 8080 上执行,以使我们的 Webhook 可公开访问。
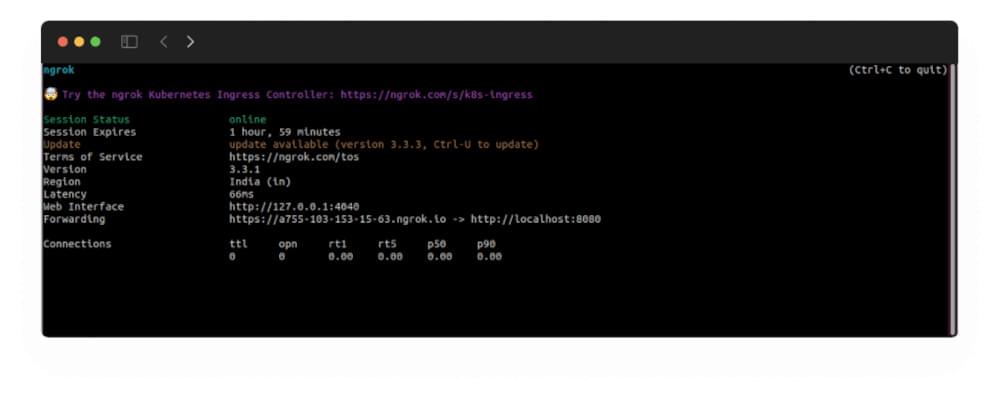
Ngrok 方便地提供了一个公共转发 URL,我们稍后将在 Crawlbase Crawler 中使用它。
创建 Crawlbase 爬网程序
回想一下我们之前通过 Crawlbase Crawler 创建的讨论 爬网仪表板。 借助 Ngrok 的可公开访问的 Webhook,制作爬虫程序变得毫不费力。
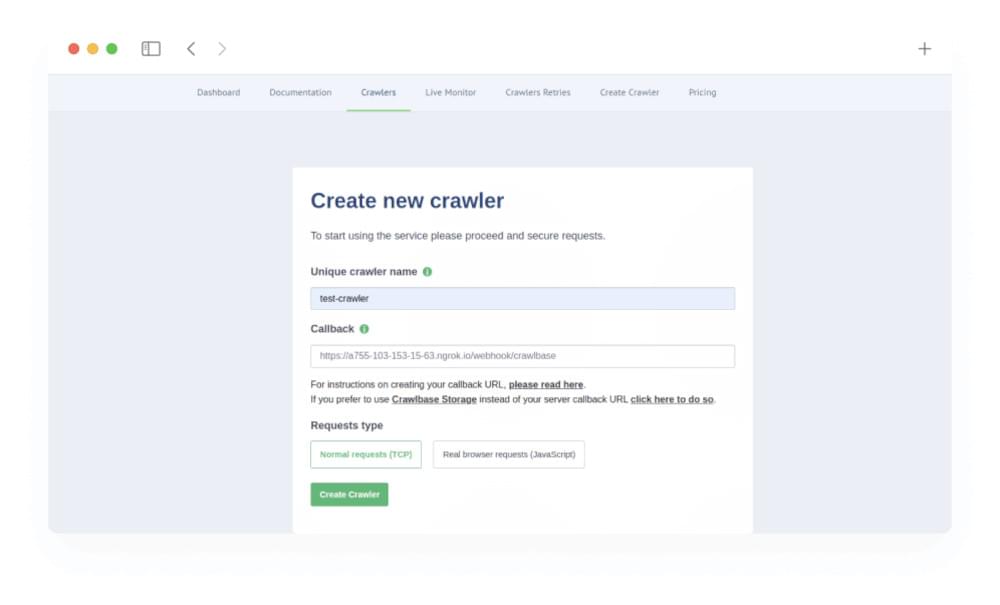
在所描述的实例中,ngrok 转发 URL 与 webhook 地址“/webhook/crawlbase”协作作为回调。 这种融合产生了一个完全公开的 webhook 地址。 我们将我们的爬虫命名为“test-crawler”,该名称将合并到项目的 application.properties 文件中。 TCP Crawler 的选择与我们的选择是一致的。 点击“创建爬虫”按钮后,爬虫就会成型,并根据指定的参数进行配置。
通过推送 URL 发起深度爬取
创建爬虫并将其名称合并到 application.properties 文件中后,我们就准备与“@POST /scrape/push-urls” API 进行交互。 通过这个API,我们将URL发送给爬虫,触发深度爬虫过程。 让我们通过推送 URL 来举例说明 http://www.3bfluidpower.com/.
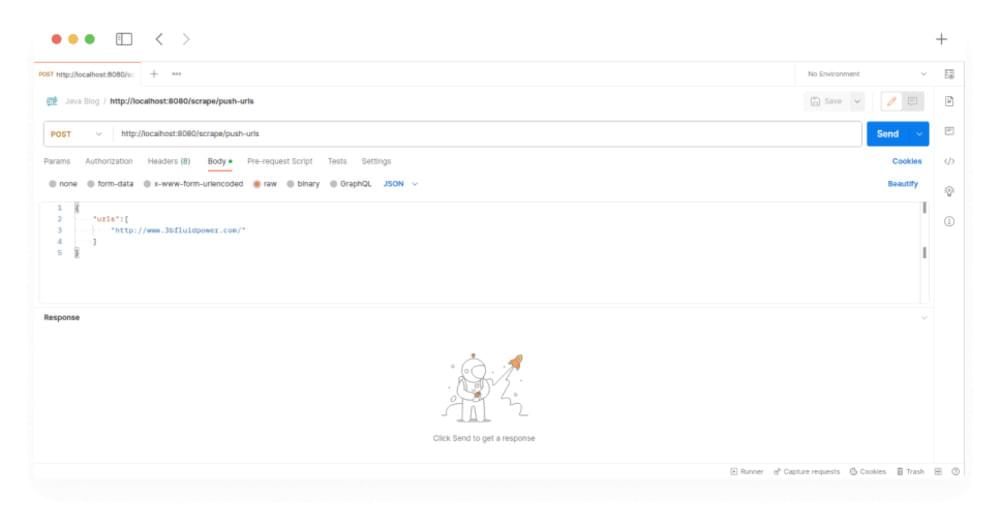
通过这种主动的方法,我们启动了深度爬行的轮子,利用 Crawlbase Crawler 的强大功能深入研究数字景观并挖掘有价值的见解。
Analyzing Output in the Database
在启动向爬虫程序推送 URL 时,会返回一个请求 ID (RID)(这是之前讨论中详细阐述的概念),标志着爬虫程序端页面爬行过程的开始。 这种策略方法消除了通常与爬行过程相关的等待时间,从而提高了数据采集的效率和有效性。 一旦爬虫完成爬行,它就会将输出无缝传输到我们的 webhook。
事实证明,自定义标头参数,特别是“类型”参数,对我们的努力很有帮助。 它的存在使我们能够区分我们推送的 URL 和深度爬行期间发现的 URL。 当类型被指定为“父”时,URL 源自我们提交的内容,提示我们从已爬网的 HTML 中提取新的 URL,然后将它们返回到爬网程序中——这次被分类为“子”。 此策略可确保仅对我们引入的 URL 进行深度抓取,从而简化流程。
在我们当前的场景中,考虑向 Crawler 提交单个 URL,工作流程如下展开:收到爬网的 HTML 后,Webhook 服务将其存储在crawler_response 表中。 随后,对该 HTML 进行深度爬行,产生新发现的 URL,然后将其推送到爬虫程序。
crawler_request表:
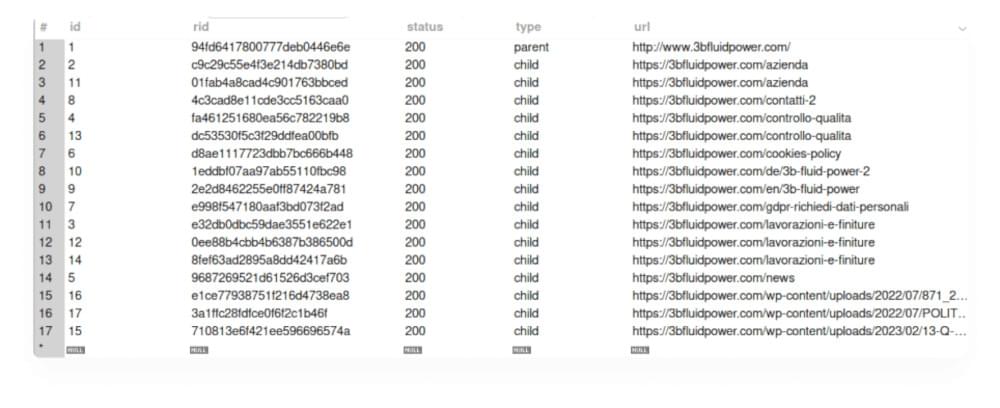
正如您在上面看到的,在我们的 webhook 服务中,我们从页面的 HTML 中发现了 16 个新 URL,这些 URL 是我们在上一节中推送到爬虫程序的 URL,我们将其保存在数据库中,并使用“type:parent”。 我们将找到的所有新 URL 推送给爬虫以深度爬取给定的 URL。 爬虫将爬取所有这些并将输出推送到我们的 webhook 上。 我们将爬取的 HTML 保存在crawler_response 表中。
crawler_response表:
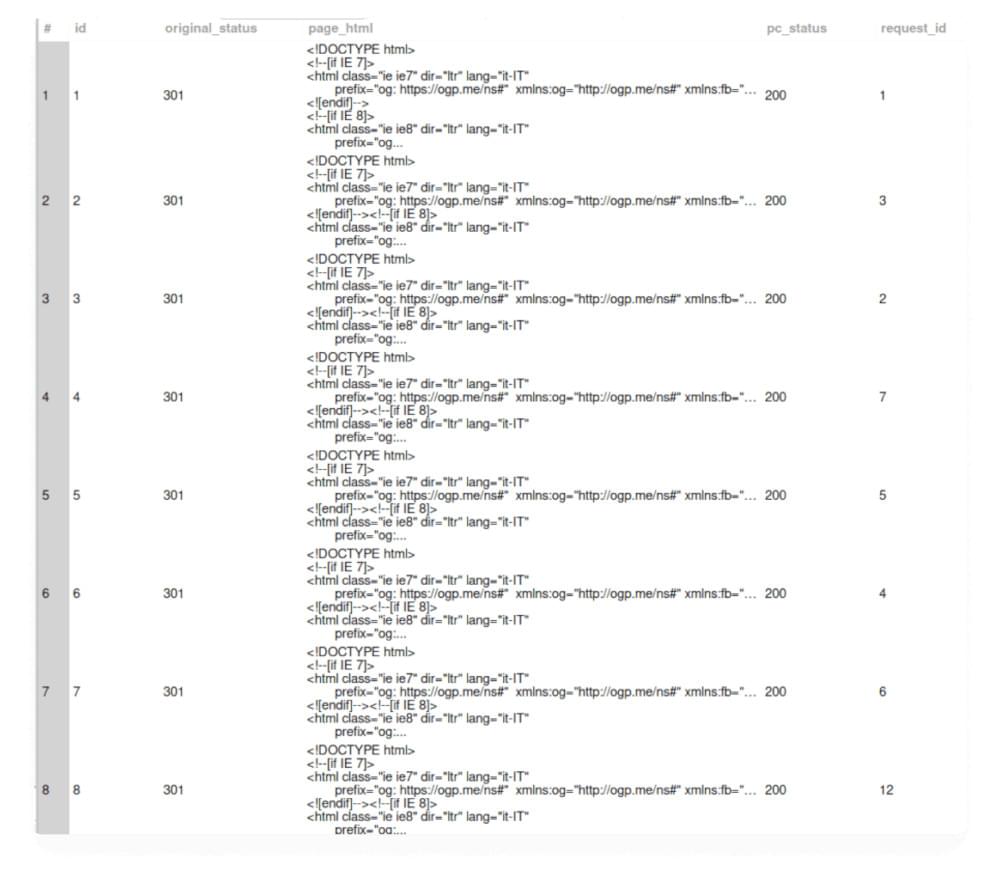
正如您在上面的表视图中看到的,我们通过 webhook 获取的所有信息都保存在表中。 一旦您的 Webhook 中包含 HTML,我们就可以抓取我们想要的任何信息。 这个详细的过程突出了深度爬行的工作原理,使我们能够从网络内容中发现重要信息。
结论
Throughout this exploration of web scraping with Java and Spring Boot, we have navigated the critical steps of setting up a Java environment tailored for web scraping, selecting the appropriate libraries, and executing both simple and sophisticated web scraping projects. This journey underscores Java’s versatility and robustness in extracting data from the web, highlighting tools such as JSoup, Selenium, and HtmlUnit for their unique strengths in handling both static and dynamic web content. By equipping readers with the knowledge to tailor their web scraping endeavors to project-specific requirements, this article serves as a comprehensive guide to the complexities and possibilities of web scraping with Java.
As we conclude, it’s clear that mastering web scraping in Java opens up a plethora of opportunities for data extraction, analysis, and application. Whether the goal is to monitor market trends, aggregate content, or gather insightful data from across the web, the techniques and insights provided here lay a solid foundation for both novices and experienced developers alike. While challenges such as handling dynamic content and evading security measures persist, the evolving nature of Java web scraping tools promises continual advancements. Therefore, staying informed and adaptable will be key to harnessing the full potential of web scraping technologies in the ever-evolving landscape of the internet.
感谢您加入我们的这段旅程。 您可以在 GitHub 上找到该项目的完整源代码 点击此处。 愿您的网络数据工作与您在这里获得的工具和知识一样具有变革性。 随着数字化格局的不断发展,请记住创新的力量掌握在您的手中。
For more tutorials like these follow our 新闻, here are some java tutorial guides you might be interested in
How to Scrape G2 Product Reviews
常见问题解答
问:使用爬虫需要使用JAVA吗?
不,您不需要专门使用 JAVA 来使用 Crawlbase 爬虫。 Crawler 为各种编程语言提供了多个库,使用户能够使用自己喜欢的语言与其进行交互。 无论您熟悉 Python、JavaScript、Java、Ruby 还是其他编程语言,Crawlbase 都能满足您的需求。 此外,Crawlbase 提供的 API 允许用户在不依赖特定库的情况下访问 Crawler 的功能,从而使具有不同语言偏好和技术背景的广泛开发人员可以使用它。 这种灵活性确保您可以使用最适合您需求的语言将爬网程序无缝集成到您的项目和工作流程中。
Q: Can you use Java for web scraping?
Yes, Java is a highly capable programming language that has been used for a variety of applications, including web scraping. It has evolved significantly over the years and supports various tools and libraries specifically for scraping tasks.
Q: Which Java library is most effective for web scraping?
For web scraping in Java, the most recommended libraries are JSoup, HtmlUnit, and Selenium WebDriver. JSoup is particularly useful for extracting data from static HTML pages. For dynamic websites that utilize JavaScript, HtmlUnit and Selenium WebDriver are better suited.
Q: Between Java and Python, which is more suitable for web scraping?
Python is generally preferred for web scraping over Java. This preference is due to Python’s simplicity and its rich ecosystem of libraries such as BeautifulSoup, which simplifies parsing and navigating HTML and XML documents.
Q: What programming language is considered the best for web scraping?
Python is considered the top programming language for web scraping tasks. It offers a comprehensive suite of libraries and tools like BeautifulSoup and Scrapy, which are designed to facilitate efficient and effective web scraping.


